Tag Archives: recipe

Manning Up to Meatballs

24 Jan

I have been very sneaky about meatballs lately.

I have a secret (until now) fear of attempting meatballs and having them fall apart when I fry them. I love fried foods, but hate frying. I never get it right!

But my son loves meatballs (we call them albóndigas), they reheat well, are convenient for lunches, and keep frozen for ages. And then of course, I prefer him (and me) to eat homemade everything. So I resort to manipulation.

I get the meat (3lbs organic ground beef) and then tell my dad I need his help to do meatballs because I want to learn his recipes and techniques (which is true), because he makes the best meatballs in the world (also true), and because with my son vying for my attention all the time, it is hard for me to get such a project done all by myself (also true).

Then, my dad – who has always been the kind of father who would start helping with your science project and end up constructing a windmill of Frank Lloyd Wright-worthy grace, proportion and utility while you sat idly watching over his shoulder, without getting a chance even to drive a nail – well, he takes over the meatball-making process, so by the time he is heating the oil, I am either making a salad, doing dishes or otherwise safe from the dreaded frying process.

This time, however, there was thawed meat that needed cooking, no dad to call on for assistance and too much seasoned ground beef already stocked in the freezer to make switching gears a viable escape route. It was a snow day and Leandro was occupied with visiting friends. So, I had to face my fear and man up. It was time to make some meatballs.

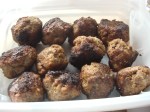
And meatballs I made using the recipe I have been writing down and editing everytime I watch my dad make them. He is getting used to using measuring instruments instead of just eyeballing the ingredients so I get an accurate measure.

The frying went fine, once I traded in the spatula and began using my beloved tongs to turn the meatballs frequently while browning. Are they as good as my dad’s? Well no, not yet. Next time I think I will leave out the oil in the seasoning paste and I still have to work on my rolling and frying for a firmer, more evenly cooked result. But I have busted through the fear that was preventing me from trying and flavorwise they are outstanding. Really, really good. As Leandro said when he ate them (reheated) for dinner tonight, “These meatballs rock in my tummy, Mommy!”

Pedro’s Albóndigas

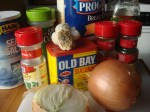
5 cloves garlic, peeled

1 Cup onion, chopped

2 Tbs olive oil

1 Cup flat fresh parsley (stems removed) or 1 Tbs dry

¼ 1 tsp chile powder

2 tsp Old Bay Seasoning

1 tsp salt

3 lbs ground beef (you can substitute 1lb of pork for 1lb of beef)

2 whole eggs (optional)

1 cup breadcrumbs (plain or seasoned)

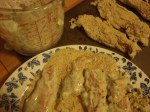
Whir garlic, onions, olive oil and parsley in a blender or food processor until minced fine. Add chile powder, Old Bay and salt and pulse a few times until it forms a paste.

In a large bowl place meat, seasoning paste, optional eggs, and bread crumbs. Mix well so that breadcrumbs are evenly distributed. Using your hands, roll into balls about 1.5 inches across. You can dip your hands in water to keep from sticking.

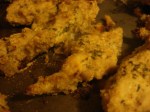
Heat 2 Tbs oil in heavy skillet at medium heat until the oil flows like water and a meatball dipped in it sizzles softly. Fry several at a time (use tongs to turn quickly) browning on all sides, then lower to medium low and cook for about six minutes, shaking the pan and turning meatballs occasionally. When they are cooked through, cool on paper towels. Can be frozen for three months in an airtight container.


Advertisement

Oh. My. Cod. Fresh Filets with Onions and Capers

20 Jan

As a Caribbean person, I often forget the existence of fresh cod.

In my world, cod is called bacalao, usually comes in salt-crusted bricks or paddles, much as it was when it arrived in the New World, masterminded by intrepid Basques and other seafaring peoples, to make an important (and tasty) protein source last and last and last. It has to be soaked for ages with many changes of water and, if you don’t like fishy-fish, you are probably not going to like bacalao.

I promise that I will get to the fresh (non-fishy, non-salty) version in a second and give you a killer recipe that is all flair and no hard work and can be used with any firm-fleshed white fish, but  indulge me for a moment as I take my tastebuds for a saunter down a Puerto Rican Cuisine Memory Lane.

Think batter-fried bacalaitos (best-eaten from a battered pot full of dubious grease bubbling over coals at a palm-roofed beachfront kiosk marshalled by an old lady in rollers and washed down with an ice-cold Medalla beer), or shredded into rice (arroz con bacalao) for the holidays, or dressed with vinaigrette and served with boiled tubers (serenata) on a Lenten Friday, or in a reddish sauce with hard-boiled eggs (bacalao a la vizcaína) any old time.

I am dabbing nostalgic tears from my eyes and nostalgic water from the corners of my mouth right now, overwhelmed by food memory.

Fortunately, my present latitude offers some solace.

As a Caribbean person adapting to living in the cruel Northeastern winter, frozen fish has taken the place of salted fish (and fresh too, to be honest). And so, I recently discovered the wonder of some vacuum-packed slablets of frozen fresh cod (a phrase which only makes sense in contextual comparison to salted fish) at, you guessed it, Costco Warehouse. As it is “Wild Alaskan”, it is also a good choice from a non-polluted environment and in terms of sustainability (visit the Monterey Bay Aquarium Seafood Watch site if you are concerned about that sort of thing http://www.montereybayaquarium.org/cr/cr_seafoodwatch/sfw_recommendations.aspx). I sauteed a couple experimentally just for me and the result was a quick yet good-looking plate of big flakes of fish just sliding apart and yet another way to incorporate capers into a dish.

This one I would definitely serve on date night.

Sauteed Fresh Cod Dressed with Onions and Capers

(tilapia or any firm white fish would work well here)

1 Tbs extra virgin olive oil

1 Tbs butter

2 small slabs fresh cod filet (5-8 oz each)

Salt and pepper

½ medium onion, peeled and sliced thin

1-2 tsp capers, mostly drained

Heat oil and butter together in a heavy skillet at relatively high heat.

Using about ¼ tsp salt, sprinkle fish on all sides. Do the same with the pepper, preferably fresh cracked.

When the foaming of the butter subsides, cook fish on each side at high heat until just white. Then lower heat and cook on each side from 4-6 minutes each (I prefer my fish somewhat undercooked; if you are just learning to cook fish, simply use a fork or knife in the center to check for done-ness: no more translucence).

Remove cod and set on a plate (preferably warm). In the same skillet, sauté the onions in the oil and butter at medium high until wilted and somewhat tender. Add the capers to warm them up. Then spoon the onions and capers over the fish and serve.

This fish would be great over wilted greens, polenta or couscous or with Snap and Go Asparagus. I ate my second slice cold over salad and it was yummy!

It’s Winter and I Am Roasting (vegetables)

17 Jan

Moving and angst are natural partners. We’ve been moving upstairs and emptying a storage unit  this week — as in:

“I didn’t even know I still (or ever) had this!”

“Where the f**k did all this crap come from?”

“I have never seen a dust mouse that big. Ever.”

“Oh God, how am I going to get all this done before the semester starts on Tuesday?”

“Leandro please don’t run in front of: the moving truck/hand truck/person trying to move a big box up the stairs/me. ”

“Sweet Jesus, the moving guy just looked in that long-unopened drawer before I  had a chance to remove the scandalous lingerie that I had completely (and sadly) forgotten about.”

…etc. etc. etc….

and add to that an aching, frigging back from said moving, ’cause the ten years that have passed since I last saw that stuff haven’t made me any younger. Heavy sigh.

So, our diet has not been virtuous – Chef Boyardee was on the menu more than once; reheated pizza, Cheese-Its, leftover Halloween chocolate, cheese and crackers, cheese and crackers, salty popcorn, basically a diet of shut-up food all in front of the T.V. and endless repeats of a Scooby-Doo video — where can I buy those Scooby Snacks, anyway, cause Lord knows they would fit right in with my current mode…

But within the frenzy, I have made some good food happen too, thanks to some of the very recipes you have seen here. The spinach sauce for pasta served for a couple of meals, especially because I used farfalle (bow ties), which Leandro really really digs (and which grip a lot of spinach).

I made the basic seasoned ground beef in a big batch, a third of which went into an impromptu pasta dinner for friends on Friday, another third into chili con carne with rice Saturday, then on tortilla chips with cheese today (Sunday) and another third is frozen for next week and the new semester.

I also roasted vegetables.  This is something I do all winter (it’s too damn hot in the summer to turn on the oven) and then eat the vegetables all week in different formats. This is just one version (as I continue to crave asparagus in the off-season). It really is best with the linguine, but I was pressed for time and my son is not yet interested in this kind of dish, so I just served it to myself (several days running) with leftover rice and a dash of soy sauce. I also gave a plastic tublet to Leandro’s godmother (a teacher) for her take-to-school lunch.

Roasted Vegetable Linguine

2 packets (about 20 oz) baby bella mushrooms, washed and sliced

1 lb asparagus, trimmed and cut into 1 ½ inch pieces

1 bunch broccoli crowns, separated into florets

1 red pepper, cored, seeded and chopped

1 medium onion, chopped

5 cloves garlic, chopped

3 Tbs olive oil

½ tsp red pepper flakes

1 cup cherry tomatoes

½ cup white wine

½ lb linguine

½ cup torn fresh basil leaves or 1 Tbs dry oregano

Preheat oven to 450°F.

Toss all vegetables (except tomatoes and herbs but including red pepper flakes!) and oil into a large roasting pan and roast for 20 minutes, stirring once or twice.

Get your pasta water on the boil and prepare pasta according to package directions. Save ½ cup pasta water when draining.

Add tomatoes to pan and roast 10 more minutes. Transfer vegetables to a bowl. Set pan on two burners on medium heat and add wine, stirring and scraping off burnt bits. Simmer for 3 minutes or so, until wine has cooked off then add reserved pasta water.

Return pasta to pot, add vegetables and liquid from pan. Warm to serving temperature and add herbs.

Chicken Aversion Averted

10 Jan

I have to say it up front: Chicken grosses me out.

I don’t particularly like working with it raw, I find it boring to eat, and the whole factory chicken thing makes me kind of sick.

There are exceptions of course; chicken soup (sopa de pollo) from the Dominican 4 Restaurant in Farmingdale could make a dead man…resuscitate, shall we say. My dad grills chicken in any number of delicious ways and he also rolls it up with sundried tomatoes and other delicious stuff and bakes it, all with irresistable results. And the ultimate: is there anything lovelier or more civilized on a cold day than a roast chicken with winter vegetables?

Fighting chicken is a useless battle. People love chicken. The average per capita consumption of chicken in the U.S. is somewhere between 60 and 90 lbs per year depending on which graph you are looking at. If you entertain, you probably have to serve chicken at some point.

Kids also like chicken. They eat pounds of chicken nuggets per year (which I assume counts on “consumption of chicken” graphs, although by the looks of a lot of these “chicken” nuggets, there is very little chicken involved; I believe what they call chicken “tenders” are actual chicken, not ground up bits with other ground up stuff).

I have a kid and like all kids whose parents let them watch T.V., he is subject to the relentless McNugget marketing assault . But before I surrender the chicken nugget thing to BK and Mickie D’s, I am trying to romance my son’s texture and flavor palate with something that actually resembles food.

I have two things on my side:

1) that same Dominican 4 Restaurant in Farmingdale and their chicharrones de pollo (fried chicken strips) that are so awesome and delicious that my English-dominant son will say whole paragraphs in Spanish to waitresses he has never met before to make sure he gets them.

And 2) when I make the following oven-baked chicken fingers at home, Leandro gets to hammer the hell out of the chicken breasts before I bread them!

I freeze most of them for good packed lunches (if your daycare or school will re-heat). And to help my chicken aversion, I buy the organic chicken three 1-lb packs at Costco.

Oven-baked Chicken Tenders

2 cups nonfat plain yogurt (you can use buttermilk, but since you can’t buy buttermilk in small containers and I don’t drink it or use it for much else, I substitute yogurt)

2 Tbs mustard

1 tsp salt

2 Tbs dried oregano

2 Tbs dried parsley

2 tsp cumin

3 lbs boneless, skinless chicken breast, pounded (under wax paper) to even thickness and cut into strips (I actually have a meat tenderizer/pounder hammer, but I have used a rolling pin and other creative methods)

2 cups breadcrumbs in a flat plate for coating

Olive oil for drizzling

Heat oven to 400°. Line a baking sheet with a wire rack or lightly grease a baking sheet/al-foil. Mix yogurt and spices in a nonreactive dish. Dip chicken in wet mixture, then coat in breadcrumbs.

Transfer to baking sheet. Drizzle with oil then bake in oven until cooked – 20 minutes (less if you really pounded the chicken). If you use a rack, you don’t have to turn. If you are cooking directly on a baking sheet, turn halfway through. If it hasn’t crisped up, you may want to give it a few minutes crisping on the broiler. If you are planning to freeze and/or reheat (which you probably are, if you are doing 3 lbs!), don’t bother crisping. Serve with whatever dipping sauce you like (we do ketchup!)

Later, you can heat in the oven with tomato sauce and cheese and call it chicken parmesan!

If you are freezing, layer with wax paper.

Three common ingredients = one uncommonly good pasta sauce, FAST

5 Jan

So we spent another evening in the emergency room and Leandro got another four stitches, this time in the forehead. With that kind of excitement going on, you can be sure that once the chocolate ice cream dinner for brave boys was up, I was STILL going to be too tired for anything elaborate in the kitchen.

Marcella Hazan to the rescue. This queen of the kitchen’s Essentials of Italian Cuisine is a much loved and much soiled recipe book over here. These days I don’t have the resources for some of the more ambitious dishes, but her tomato sauce with onion and butter is simple and perfect: three ingredients resulting in one glorious, sweet, rich sauce that you barely have to stir!

I have adapted it slightly to make it even faster (puree, rather than whole tomatoes, adjusted the butter, for example). The beauty of this one is that it can be done in the time it takes you to boil up the pasta.

Marcella recommends potato gnocchi under the sauce, but the pre-prepared ones are generally yucky and I ain’t making gnocchi myself any time soon (oh for the heavenly days that Fabiola made it for me in Rovereto!).

These days I buy fresh ravioli from Fairway Market (no preservatives and a variety of fillings – $6 for 24) and actually freeze it. It breaks off into convenient serving sizes and takes about 15 minutes to cook after you drop them in the boiling water and the boil comes back. They re-heat pretty nicely, so I make extra for my little guy’s lunch box, just adding a dab of butter to the hot ravioli so it doesn’t stick.

I used cheese ravioli this time. “Mama I really love this!”


Steamed broccoli can be dipped in the sauce

Tomato with Onion and Butter

28 oz. can tomato puree

6 Tbs butter

One onion, peeled and cut in half (I prefer red onion for extra sweetness, but use whatever you have; yellow is fine)

Cook all three ingredients together in a deep pot with a lid at medium to low heat until the fat begins to separate from the tomato (about 20 minutes, or the amount of time you spend boiling the pasta). The longer you cook it, the sweeter it gets, so if you have more time, use it!

Spoon over your favorite pasta and serve with loads of good grated cheese (Parmigiano Reggiano or Gran Padano)

Snap and Go Asparagus (fast and fun)

4 Jan

I dared to go off-season this week and it was well worth it.

When Spring rolls around I am on the phone to the local North Fork farms to find out exactly when they will be harvesting asparagus. There is nothing, nothing, nothing  better than the sweet, buttery green-ness of fresh-from-the-earth asparagus. I eat it for the six weeks of May and June that it is harvested (nevermind the odd smell of bathroom visits! More on that later), raw, steamed, sauteed, roasted…however.

However, it is not Spring right now! Asparagus may be in season somewhere, but not in my grow Zone.

Usually I stick to our local seasons, but the bunches of asparagus at one of the local grocery stores just looked so good that I got a craving that virtue could not curb. Hey, it’s been a tough holiday and virtue doesn’t seem to be handing out its own rewards at the moment. What the imported stuff lacked in farm-to-table zest, I made up for in garlic.

At $3.99 a lb, you might not find asparagus cheap (especially when you snap a third off the bottom!). Asparagus (which is a member of the lily family) tends to be expensive because it has to be harvested by hand. But it is certainly easy to prepare, and made for a speedy yet chic snack for me and my friend Jamie on a recent playdate (during which the kids ate – you guessed it – pizza). 

Please note, you can look very sexy nibbling asparagus if you let yourself go a bit. For that purpose, and for this barely-cooked recipe, I recommend the skinny asparagus over the fat.

Snap and Go Garlic Asparagus

1 bunch fresh asparagus (about a pound), rinsed and trimmed*

1-2 Tbs olive oil

2-3 cloves garlic, peeled and chopped, not too fine

salt for sprinkling

Heat the oil in a large skillet at medium heat until fragrant. Toss in the garlic, turn to coat, sauté an additional minute, then toss in the asparagus. Stir to coat then allow to cook for 5-10 minutes (the fresher and thinner the shorter the cook time). You can test them after five minutes by trying a stalk. You just want it tender and warm, but not mushy. Sprinkle with salt, and serve.

*Prepping the asparagus is fast and easy, but requires some explaining:

Rinse the stalks. Take one stalk and snap off from the bottom; there will be a natural break (sometimes it’s as far as a third of the way up!), which will scare you because you have spent money on this asparagus, dadgummit! The point, however, is that the stalks can be woody (especially if it is not-so-fresh) and the woodiness creeps up from the bottom. Some people use that first stalk as a measure and use a knife to trim all the rest. I snap each one. Discard the bottoms. Dry the remaining stalks.

(I often use this as a side dish to eggs or steak, but will also just do a pan and eat it with my fingers, as Jamie and I did on Sunday. Delicious and dead simple).

Fun science notes: Now, about the asparagus and urine connection. Apparently some people detect a sulfurous odor in their pee after eating asparagus (I definitely do) and others don’t. The jury is still out on whether that is because some people don’t produce the odor or they just can’t smell the difference. According to some of my online searches, Ben Franklin found the odor disagreeable, while Marcel Proust thought it rather fragrant (so the differences of olfactory opinion between the Yanks and the Franks go waaaaay back and waaaaay deep). At any rate, the odiferous asparagus mystery raises interesting questions about human digestion and sense of smell in general and may hold the key to greater understanding of what the nose knows and why.

Party Snacks: Tortilla Torcal, a Spanish egg frittata with chorizo and ham

21 Dec

Today I lived my owned sour grapes fable. You remember: the Aesop story about the fox who can’t reach a bunch of grapes that are taunting him from a high vine. In the end, the fox gives up and consoles himself by saying, “Those grapes were probably sour anyway.”

Well, the tortilla flipper is probably overrated anyway.

Like the fox, I won’t find out whether this wondrous invention is as tasty as it looked on the online pages of a Spanish product vendor. It looks like two skillets hinged together that make flipping a classic Spanish tortilla (savory stovetop egg pie) easy. Like, you won’t burn your forearms as you upturn the eight not-quite-cooked eggs onto a plate and then slide the tortilla back into the skillet and you won’t make a goeey, cementy, eggy mess as the uncooked bits goop out of the skillet…

Nah, what would be the fun of that? Why take a muscle-y, down and dirty, daredevil sacrifice for the sake of food and turn it into a clinical, tidy, bloodless, soul-less operation?

Never. Not even if I could spare $50 to purchase another piece of kitchen equipment I have no room for.

So, screw the tortilla flipper. Or unscrew it. Or unhinge it. Forget it.

The tortilla itself, however, is a worthwhile enterprise. This is a case where the “easy” in “Hot, Cheap & Easy” is relative. A relative lie, actually. Making a Spanish tortilla takes time, patience, some strength and a set of stones. However, when you make a good one, your guests will lavish you with praise, something I am quite fond of.

And since I can make it the night before an event, it’s handy and portable.

The classic tortilla española is potato and egg, but this one, inspired by Penelope Casas’ recipe for Tortilla Torcal in her book Tapas makes it a mightier, spicier dish that really dresses up a tapas night.

Tortilla con chorizo y petit pois

1/2 cup olive oil

3 medium potatoes, peeled and cubed

8-10 eggs

1/4 tsp salt (optional, reduce or leave out if the ham is very salty)

1 small onion, chopped fine

1/4 lb. spicy Spanish-style chorizo sausage, peeled and diced

1/4 Cup ham steak or other cured/fully cooked ham, diced

1/4 Cup frozen peas, cooked


Heat the oil in a skillet and add potatoes, lower heat and cook potatoes slowly, turning frequently. When they start to brown, they are more than done. In a large bowl, beat the eggs lightly with the salt. Drain the potatoes, reserving the oil. Add the potatoes to the egg mixture and mix just barely (this gets the temperatures even).

Heat one tablespoon of oil to the skillet and sauté the onion until tender. Add the chorizo and the ham and cook just until the chorizo begins to release its oil (it will get bitter if allowed to cook more). Add the peas and cook for another few minutes. Stir very gently into the eggs and let sit for at least five minutes. Meanwhile, make sure your skillet (9” or 10” made of a material that is not too heavy!) is really clean, then heat two more tablespoons of oil and pour in the egg mixture. When you see the egg begin to cook on the edges, lower heat to medium low and cover. Allow to cook for ten minutes, until the center is thickened.

This is where it gets challenging. Get a plate that will fit smoothly to the edges of the skillet. The plate should be flat-surfaced, with no changes in levels. Take the skillet to the sink, put the plate on top and, with your hand firmly on the plate, turn the skillet over so the tortilla turns onto the plate (this is where the goo can scald your forearm, if you are unlucky or not careful). Then slide the tortilla back into the skillet, wet side down. Put back on heat and cover, continuing to cook until done (another five minutes or so). In the meantime, wash and dry the plate. When the tortilla is done, flip it back onto the plate and behold its golden loveliness.  

Allow to cool (I actually refrigerate overnight after it cools, wrapping in foil or plastic wrap or both). Serve at room temperature, or warm; it’s good at any temperature. I usually cut into squares for a tapas party and stick the squares with toothpicks to get people started.

 NB: Penelope Casas and other Spaniards prefer their tortillas a bit juicy inside. I find that Americans are too concerned about salmonella for that (and probably rightly so), so I cook it through. If you know your egg source, you should be fine cooking it rare!

Also, I really, truly thought the tortilla flipper was cool, but I think I am way cooler for doing it Old School. Sour grapes? You make the call.

Tapas, interrupted, to do some baking with the boy!

19 Dec

I have said I am not much of a baker, but I got inspired to try with my niece, the incomparable Sofia, when she was little, figuring kids will love to cook if they can make their own desserts. It was good fun.

Now I bake pretty often with my own son, Leandro. You have to be ready for a bit of a floury, batter-splattered mess, for tussles over the right time to help, for wandering attention. The pay-off is a delicious-smelling house, not-too-sweet treats for the week and, I hope, a kid who knows his way around a kitchen in the future.

And, of course, the blessing of achieving something together (and not planting him in front of the T.V. in order to get something done).

We most often make mini-muffins – four trays of 12 will suffice for a standard 12-muffin recipe. Then we have 48 little muffins which we divide and deliver to various neighbors and friends (he is very proud to tell people, “I made these for you.”) and I pack three at a time in his lunch box. I also pack three at a time in my own gob, but nevermind…The downside of mini-muffins is washing the tins by hand. Let them soak first!

Here’s our simplest, entry-level recipe for banana muffins. See notes for baking with kids at the end!

Basic Banana Muffins

6-ish overripe bananas

¾ Cups sugar (regular or light brown are fine)

1 egg, lightly beaten

1 tsp baking soda

½ tsp salt

1.5 Cups unbleached white flour

1/3 Cup (5 and 1/3 Tbsp) melted butter

Preheat oven to 400°. Mash bananas in a big bowl (they don’t have to be smooth). Add sugar and egg. Add the melted butter (not too hot, or there will be lumps when it hits the cold batter). Separately, combine the dry ingredients, then add to banana mixture and combine until thoroughly wet and then stop! Spoon into greased muffin tins. Bake for 12 minutes (15 minutes for regular size). Makes 48 minis; 12 regular. Will keep for three days out of fridge, a week in.

NB: 1. Lay out all your ingredients and equipment before calling the kids to help! 2. Grease muffin tins before getting started. 3. Aprons are a very good idea. 4. This is the time to remind them about thorough hand-washing and no coughing into the batter! 5. By all means let the little ones try to spoon the batter into the tins. It will be a mess, I promise you, but the muffins come out fine and it does wonders for their fine motor skills, their concentration and their feeling of accomplishment.

On bananas: Keep a ziploc bag in the freezer for overripe bananas or bananas that don’t get finished (trimming off the bit end, of course). DO peel them first. When you have six or thereabouts, you are ready to make bananas muffins!

Tapas 2: The Best Mussels EVER (party snacks to make ahead!)

18 Dec

Mejillones a la vinagreta must be made the night before and then assembled just before serving. Enlist the help of your guests – those lovely kitchen elves who want to keep busy while watching you cook.

I love seafood and I especially love mussels. And I especially, especially love mussel dishes that force people to use their hands and slurp – there is no better ice breaker than perilous food, particularly if eaten standing up while simultaneously holding a beverage. Conversation among complete strangers is virtually guaranteed.

Also, mussels are simple. You just need to pull them out of the pot as soon as they open (so babysitting the cooking is required on this one for about ten minutes) so they don’t get chewy. This means TONGS are crucial (although I have been known to use my fingers to pluck them out in extremis).

These mussels are inspired by Spanish cuisine maven Penelope Casas. You make them the night before and then dish them into the reserved shells before serving. Crusty bread for dipping is critical.

Mussels (Mejillones) a la Vinagreta

1/2 cup olive oil

3 Tbsp red wine vinegar

heaping Tbs small capers

2 Tbsp minced red onion

1 Tbs minced pimiento (I prefer roasted red peppers, but I inadvertently bought sweet red peppers in a jar and the resulting tanginess worked out just fine)

1 Tbs minced parsley

pinch of salt and a grinding of black pepper

2-4 lbs mussels in their shells*

1 slice lemon

Whisk the oil and vinegar together, then add the capers, onion, peppers, parsley, salt and pepper. Put the mix into a large freezer bag (if you need this dish to be portable)

Boil one cup of water in a big pot with the lemon slice. Add the mussels and bring to a boil, covered. Pluck out the mussels when they open (waiting until the meat separates completely from the shell into a little sausage shape and then pulling out immediately) and put in a separate bowl to cool. Discard any mussels that do not open after ten minutes. Remove the mussel meat and put into plastic bag with the seasonings and refrigerate.

Save half the mussels shells and clean well (this is the tedious part; make sure you have good music on). Put in a plastic bag and refrigerate.

To serve the next day, arrange shells on an attractive and large platter and put one mussel in each. Spoon the remaining seasoning over each.

Serve with a dry sparkling white (like Spanish cava or prosecco – your more economical options) or a sauvignon blanc from New Zealand, or if you are lucky/geographically able, a Long Island sauvignon blanc from Paumanok or Jamesport Vineyards.

*NB: Mussels should be bought the day of or the day before making. Buy them in net bags (not wrapped in plastic) from a reputable vendor who moves a lot of product and SNIFF THEM! If they smell faintly briny and sweet, they are good. If they smell funky or of ammonia or anything that makes you wonder, then don’t buy them! Do not be afraid to ask for a different bag after sniffing; a fishmonger will only respect you the more for knowing your shellfish.

At home, store in a nonreactive bowl in the fridge, covered with a damp towel.

These days mussels from stores are pretty clean. You must still wash them in cold water and tug out any weirdy-beardies sticking out from the shell. While you wash, discard any mussels that are cracked or are open and won’t close back up if pressed together.

Tapas 1: make your own mayo

17 Dec

This is the first in a bunch of posts about an evening of tapas, the Spanish snacks. On a recent evening I made tapas for some dear friends out in Greenport (an annual event) and you need to know how to do it too. It is an elegant yet friendly way to spend a long time at the table, eating and drinking in a leisurely fashion. The recipes are easy, but some can be time-consuming (I said hot, cheap and easy, but I didn’t say fast!) especially when you want to make several dishes. So choose things you can make ahead and serve cold or at room temp.

First off, make your own mayonnaise! It is lighter, creamier and fresher than what you buy in the store, doesn’t contain preservatives or other weird ingredients (it’ll keep for about a week in the fridge) and you can flavor it with garlic or herbs.

Homemade Mayo (with garlic mayo option)

2 yolks from fresh eggs

(2 cloves garlic, peeled and chopped, optional)

2 tsp lemon juice (or vinegar, if you must)

(1/4 tsp mustard powder, optional) 

pinch salt, grating of pepper

1 1/2 Cups light or extra-light olive oil (you can use different oils to achieve different flavors, but for basic mayo, light olive oils work best. I find regular olive oil too overpowering)

2 Tbsp warm water

Put the egg yolks, (garlic), lemon juice, (mustard), salt and pepper in a food processor or blender and buzz for a bit. Then leave the motor running and pour the oil in through the top in a very thin stream (I like having help for this part) and the mixture will get nice and thick. Add the warm water at the end.

Some people actually beat their own mayo; if you are so inclined, then do NOT use an aluminum bowl – it will turn the emulsion gray.

I like this slathered on tortillas (recipe to come), boiled potatoes, seasoned shrimp, in sandwiches…every which way you might use mayo or tartar sauce.

Cool science: Mayonnaise is an “emulsion” or a blend of two unlike things, in this case, oil and lemon juice (liquid). The egg yolks contain lecithin and that is the element that holds this fragile union together. Without it, you would have separation, just like in salad dressing. The reasoning behind fresh eggs is not just about food poisoning; the fresher the eggs, the more potent the lecithin and therefore the better your mayo.

%d bloggers like this: